Visual Architecture
Every system, scored on every bar.
Five independent engines feed a weighted confluence score. When ≥3 align, the overlay lights up — quietly, precisely.
Market structure, order blocks, liquidity sweeps, session analysis and daily pivot levels — all scored, all automated, all in one overlay. Replace hours of manual markup with a single indicator.
Standard SMC indicators give you the building blocks — order blocks, fair value gaps, breaks of structure — and leave you to assemble the trade yourself. The problem is that having all the pieces on screen doesn't tell you when they align into a real setup.
You end up second-guessing every touch of every zone. Is this the right order block? Is the structure actually broken? Is the higher timeframe aligned? Should I wait for a retrace or enter now?
Scored SMC Structure Overlay answers all of those questions for you, on every bar, in real time. It monitors market structure, scores zones, tracks sessions and aligns higher timeframes — so when you see a setup, the analysis is already done.
Scored SMC Structure Overlay automates everything institutional and price action traders mark up by hand — structure shifts, order blocks, zones, sweeps, sessions and levels.
Fires immediately when the MSS candle is an impulsive displacement bar. Catches strong reversals that don't retrace.
Waits for price to retrace into the order block and show rejection. Catches retracement entries with tighter risk.
Fires when opposing fair value gaps overlap, creating an institutional re-entry zone.
Most SMC indicators only draw structure lines and order blocks. Scored SMC Structure Overlay goes further — every zone is scored for quality, every sweep is graded with a 9-point system, and the HTF bias dashboard tells you whether the bigger picture supports the setup. No noise, no guesswork.
A signal is only as good as the conditions that created it. Scored SMC Structure Overlay tracks the higher timeframe alignment that qualified your setup and warns you immediately if it degrades. If a timeframe flips while your trade is active, you'll see it on the dashboard before it shows up on your P&L.
This is the feature that separates Scored SMC Structure Overlay from everything else on TradingView: the indicator knows when you're about to trade into a higher timeframe wall.
The data for the zones is already on your chart — Scored SMC Structure Overlay is the only indicator that integrates structure, zones, sweeps, levels and HTF bias into a single scored overlay.
Bearish structure detected, but price is sitting on 1H or 4H demand. Proceed with caution — the HTF bias flags the conflict.
Bullish structure detected, but price is at 1H or 4H supply. The dashboard shows the misalignment so you can make an informed decision.
Full alignment: sweep locked bullish, MSS confirmed, no opposing HTF zone. Signal fires with grade.
Direction is the number one reason SMC trades fail. You can have a perfect order block retrace with a clean MSS, and it still loses if you're trading against the higher timeframe flow.
All three timeframes use structural BOS detection with a non-repainting methodology. The bias shown on your dashboard is the bias that was present when the bar closed — it never changes after the fact.
Not all setups are equal. Scored SMC Structure Overlay scores every zone and sweep so you can focus on the highest-quality setups.
A complete Smart Money Concepts toolkit built into a single indicator — structure, zones, sweeps, sessions, levels, pivots and HTF alignment.
External swing structure with configurable lookback — BOS, CHoCH, HH, HL, LH, LL. Internal structure for granular analysis. Equal Highs/Lows with ATR-threshold sensitivity.
Scored 1–7 based on candle quality, position in leg, and context. Mitigation tracking — OBs fade as price tests them. Breaker block conversion when violated.
Displacement-filtered zone creation with base candle detection. Impulse strength scoring. Touch-based degradation on repeated tests.
Standard timeframe FVG detection plus higher timeframe FVG overlay. Configurable ATR threshold filtering for signal quality control.
London, New York, and Asia session boxes with live pip range tracking. DST-aware timing (UK BST and US DST auto-detection). Session 50% equilibrium level.
13-slice visual representation of price gaps. Fill tracking as price returns to the void. Automatic cleanup when filled.
PDH/PDL, PWH/PWL, PMH/PML with cross-removal option — levels disappear when broken for a cleaner chart.
Named level identification — PDH/PDL, PWH/PWL, PMH/PML, EQH, EQL. Inducement counter with visual persistence. Optional auto-removal when levels are crossed.
Identifies when price sweeps Asia session extremes during London. A key ICT setup for London session reversals.
Everything the engine is doing — visible at a glance. No switching between tabs or timeframes.
| Feature | Standard SMC Indicators | Scored SMC Structure Overlay |
|---|---|---|
| Structure detection | Yes | Yes |
| Order blocks | Yes | Yes, scored 1–7 with mitigation tracking |
| Signals | Touch-based or crossover | Five-state engine: sweep, lock, confirm, fire |
| HTF alignment | Manual chart checking | Automated non-repainting 3-layer bias |
| Zone proximity gating | No | Blocks signals into opposing HTF zones |
| Kill zone timing | Basic session highlight | Engine only operates during institutional windows |
| Zone scoring | No | OB scored 1-7, S&D scored 1-5, SLSD scored /9 |
| Entry types | Single | Three paths: Displacement, Rejection, BPR |
| Inducement tracking | No | Named level detection with counter |
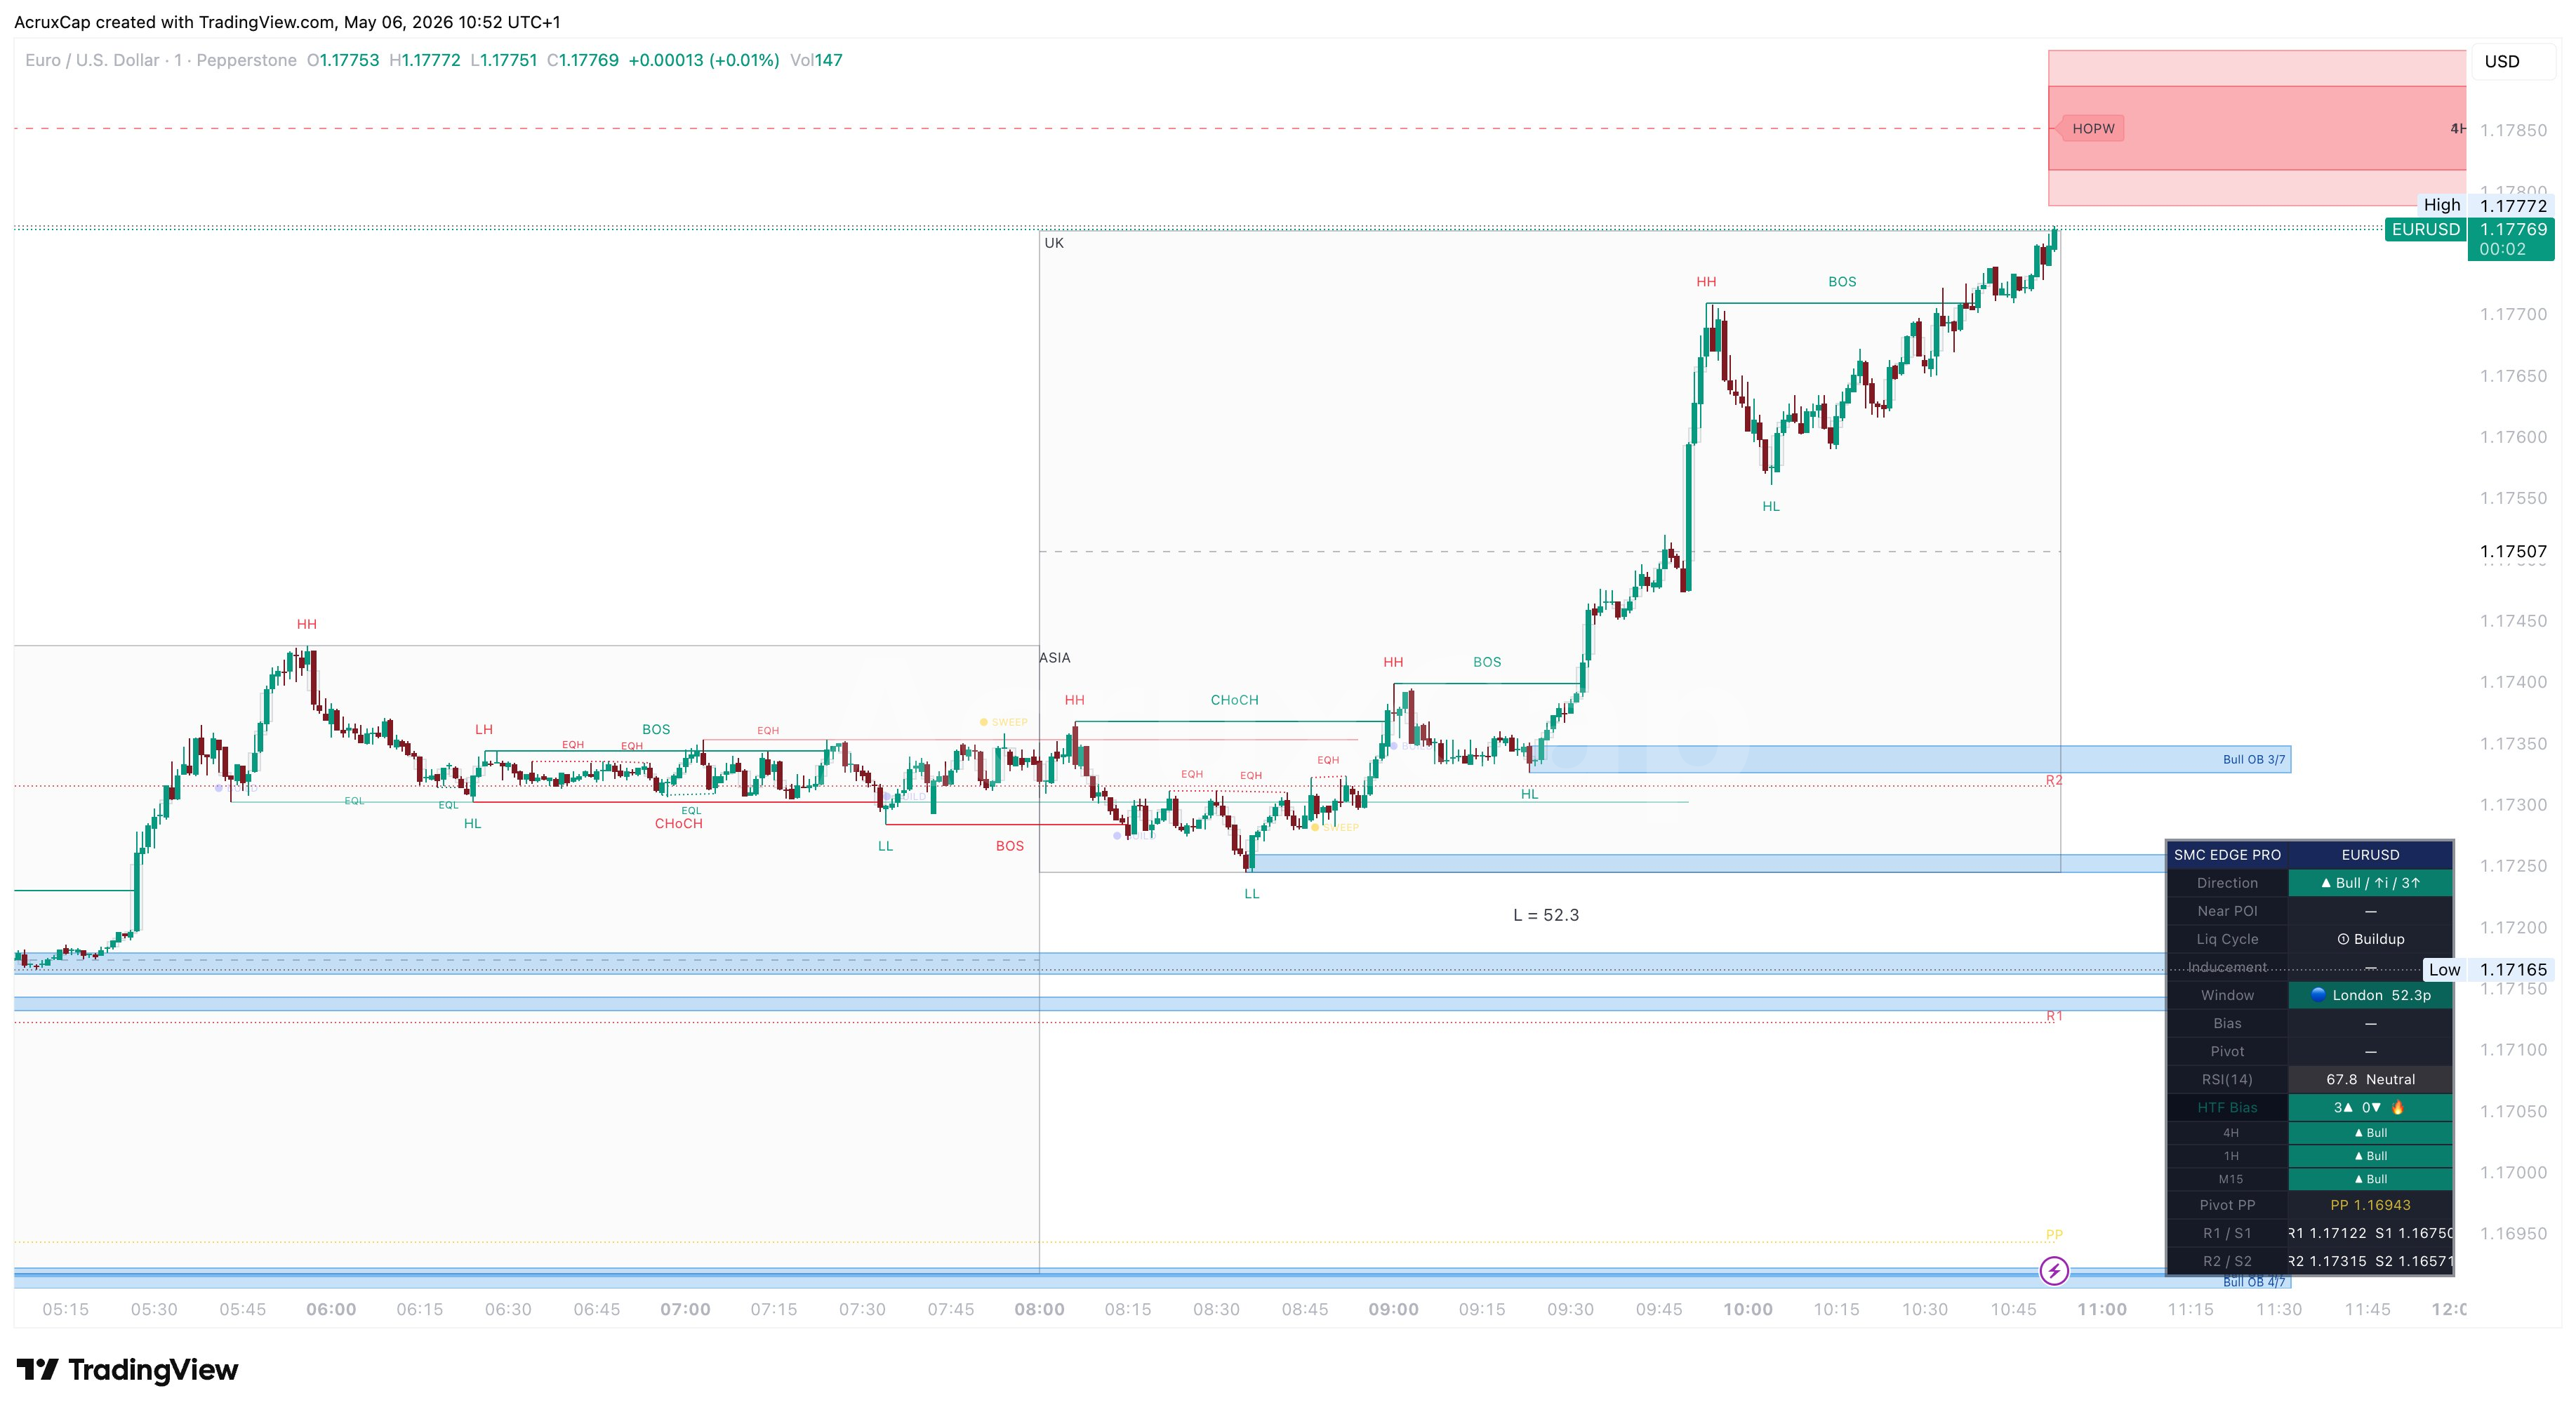
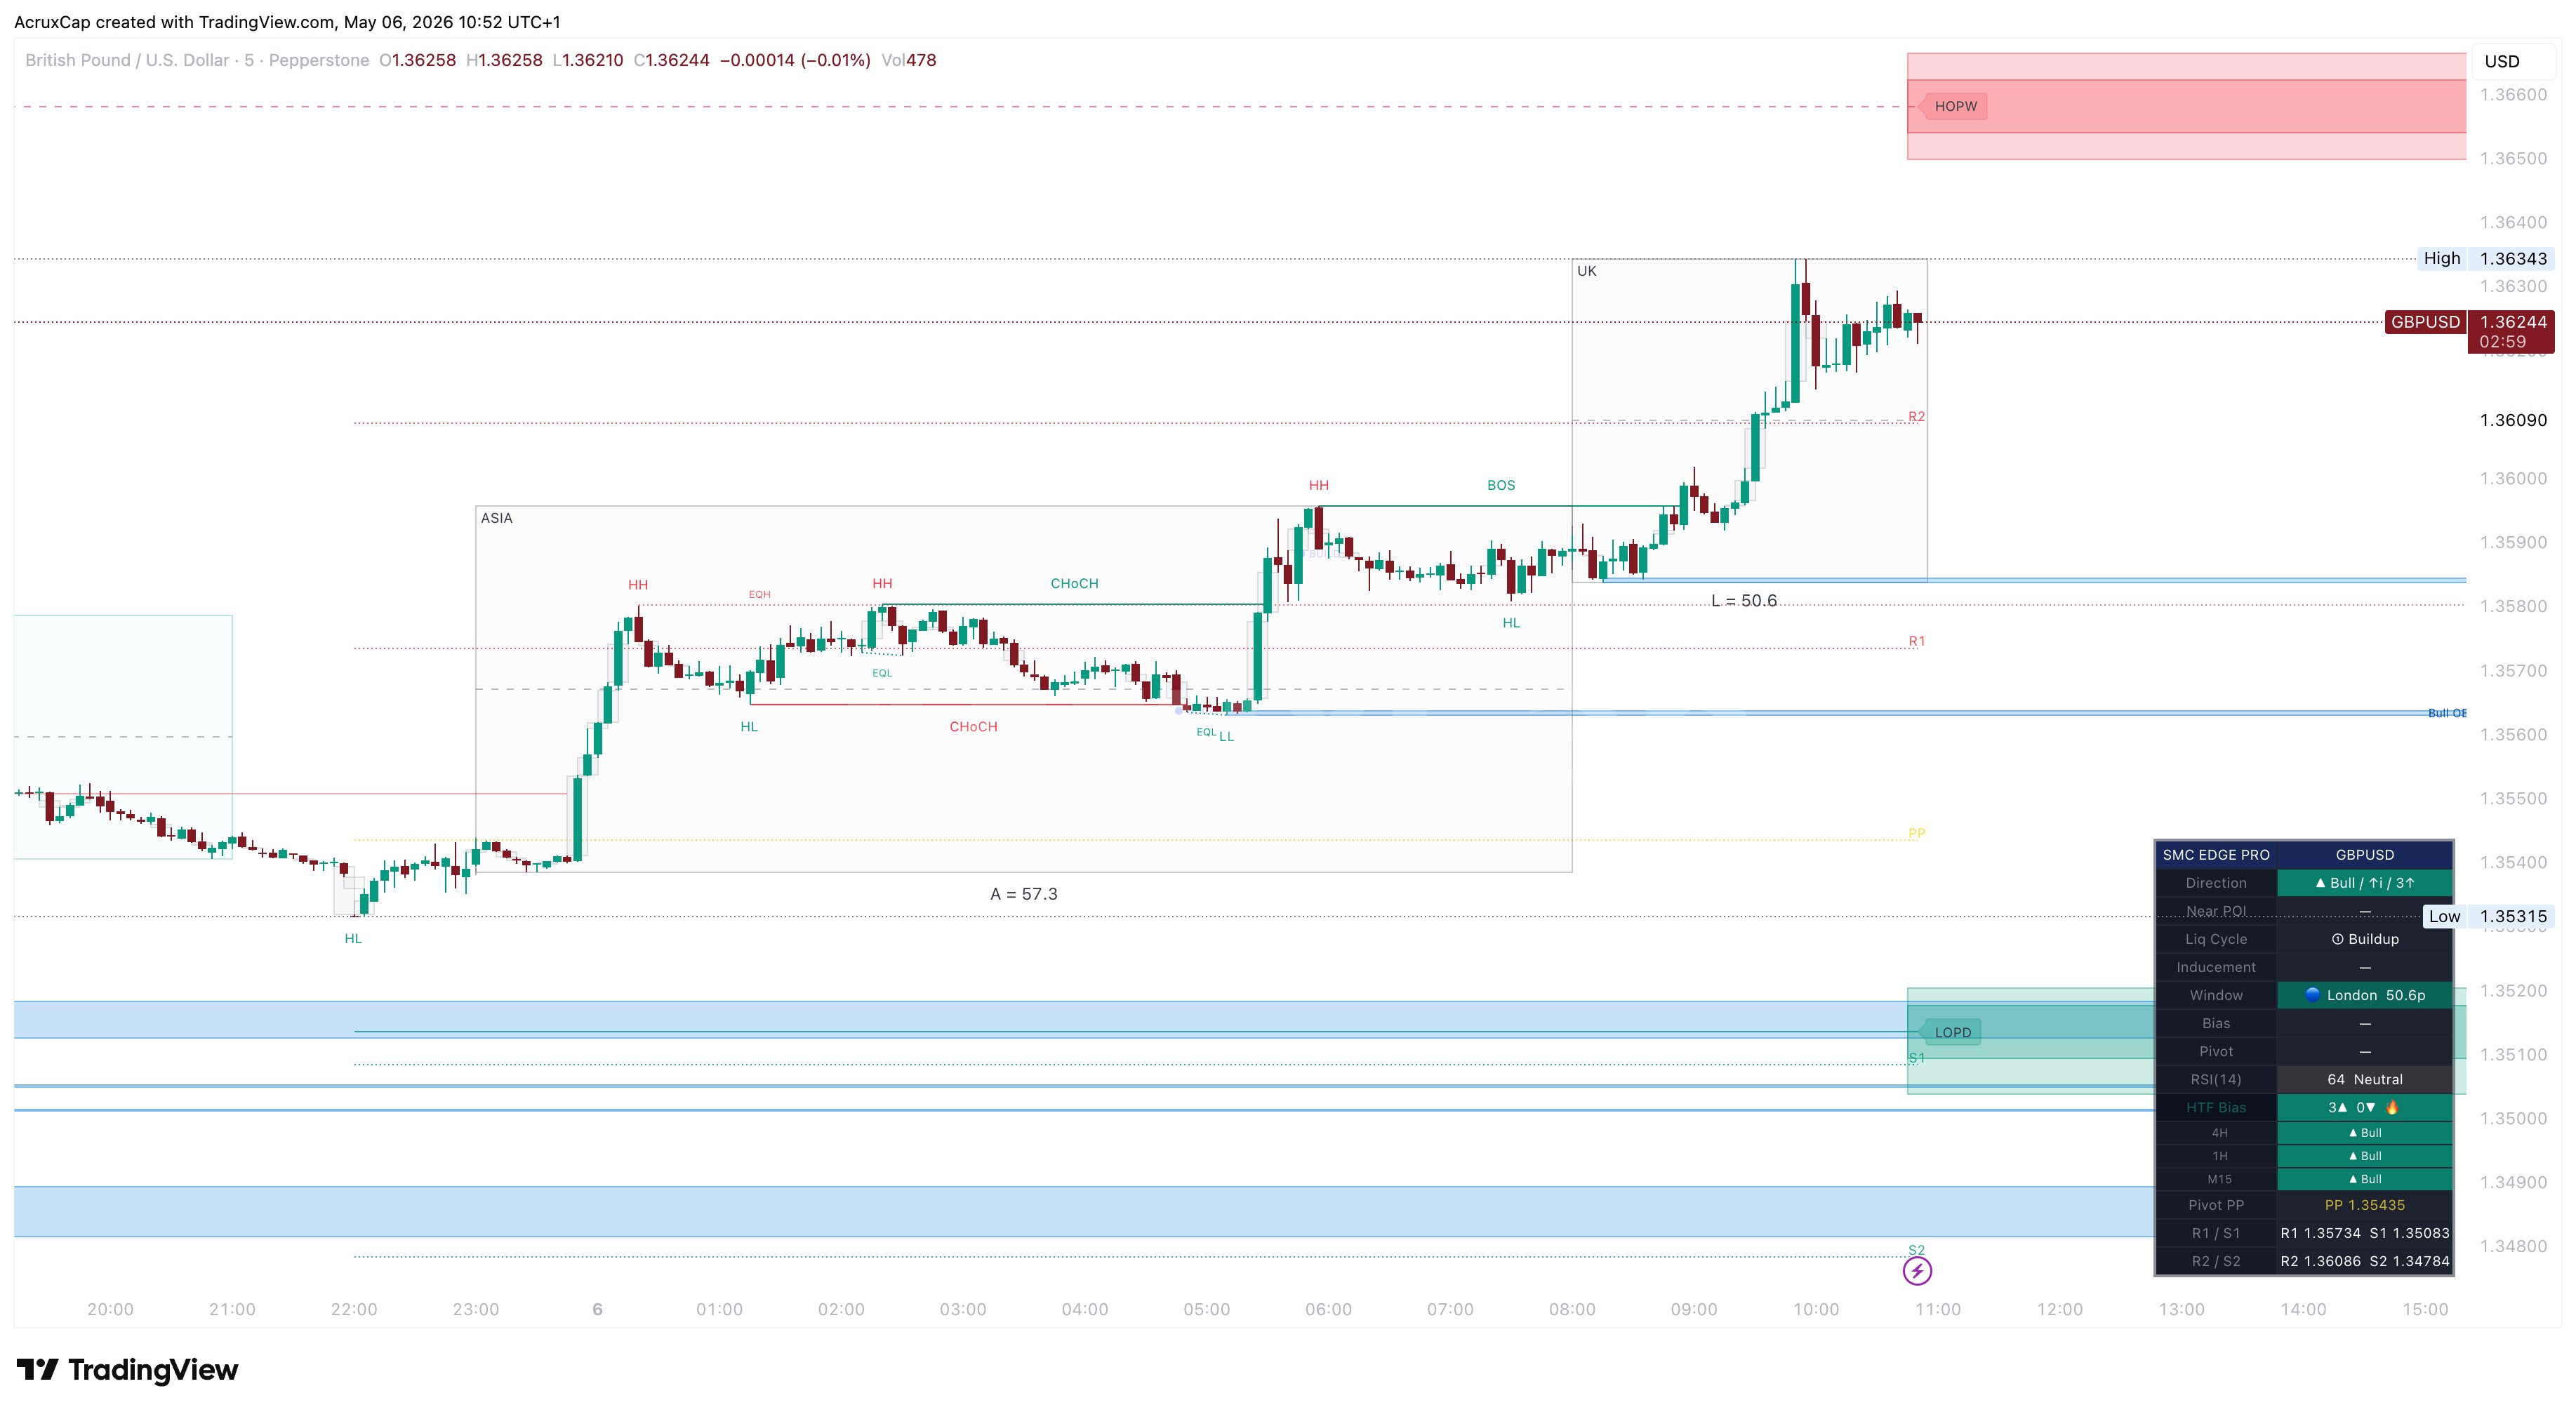
GBP/USD M5 showing the full Scored SMC Structure Overlay overlay — market structure labels (HH, HL, BOS, CHoCH), session boxes with pip ranges, order blocks, supply & demand zones, EQH/EQL, daily pivot levels (PP, R1, R2, S1, S2), HOPW/LOPD key levels, and the live dashboard with HTF bias alignment.
1H Supply zone visible top-right with price reacting off it during NY. Multiple CHoCH and BOS structure labels, session boxes with pip ranges (NY=16.3, L=26, A=27.9), and the dashboard showing bearish confirmation.
Set up a single "Any alert() function call" alert on TradingView and receive notifications for every event. Each alert includes the ticker symbol and relevant price data.
Scored SMC Structure Overlay is designed for forex, indices, crypto and commodities on any timeframe. Session boxes and DST-aware timing are calibrated for London and New York, but the structure, zone and level detection works across all instruments and timeframes.
Add Scored SMC Structure Overlay to your chart and let the five-state engine do the work. When a signal fires, you'll know the grade, the entry type, and whether the higher timeframe supports the trade.
Subscribe via TradingView · Cancel anytime
